How To Harvest Garlic and Garlic Scapes
Garlic is a versatile and delicious addition to any garden. Not only does it provide a flavorful ingredient for culinary creations, but it also boasts numerous health benefits. To enjoy the full potential of this kitchen staple, it’s essential to know when and how to harvest garlic bulbs and garlic scapes. In this comprehensive guide, we’ll walk you through the process of harvesting garlic, from planting to curing, while highlighting the optimal techniques and timings for a successful harvest. Whether you’re a seasoned homesteader or just starting out, this article will equip you with the knowledge to cultivate and harvest garlic like a pro.

Disclaimer
This post contains affiliate links. This means we may earn a commission should you chose to sign up for a program or make a purchase using these links. There is no added cost to you but your purchase through these links helps support our content! Not to worry- I truly believe in and/or use everything I promote!
We also utilize advertisements on many of our articles. This is simply a way to help support all the work we do here at Wild N Free Farms, without adding any extra cost to our readers. Check out our disclaimer and disclosure page for more details.
Understanding Garlic Growth
Before diving into the specifics of harvesting garlic, it’s important to understand the growth cycle of this remarkable plant. Garlic is typically grown from individual cloves, which are planted in the fall or early spring, depending on your region. Once planted, garlic goes through several stages of growth, including sprouting, bulb development, and scape formation. The bulb is the desired part of the garlic plant, while the scape is the curly shoot that emerges from the top. Both the bulb and the scape have their own harvest times, each offering distinct flavors and uses in the kitchen.
How Long Does It Take To Grow Garlic?
Garlic cultivation requires patience, as the growing process spans several months. From planting the cloves to harvesting mature bulbs, understanding the timeline of garlic growth is essential for successful cultivation. While the exact duration can vary depending on various factors, here’s a general overview of how long it takes for garlic to grow:
Planting

Garlic is typically planted in the fall or early spring, depending on your region and the desired harvest time. Fall planting allows for overwintering and results in larger bulbs. Spring planting yields smaller bulbs but can still be a viable option in regions with harsh winters. Regardless of the planting time, garlic cloves take about 7-10 days to sprout and emerge from the soil.
Bulb Development
After the cloves sprout, they undergo a period of bulb development. This stage usually lasts for 4-6 weeks, during which the garlic plants focus on growing and maturing their bulbs. The bulbs gradually expand in size beneath the soil, fueled by nutrients and moisture.
Scape Formation
In hardneck garlic varieties, garlic scapes, or curly shoots, start to emerge from the plants in late spring or early summer. This stage typically occurs around 2-4 weeks before the bulbs are ready for harvest. Harvesting scapes is optional but can promote bulb growth by redirecting the plant’s energy.
Maturation
The maturation process varies depending on the garlic variety and environmental conditions. Generally, it takes around 8-10 months from planting to full maturity. Softneck garlic varieties tend to mature a bit faster than hardneck varieties. As the bulbs mature, the lower leaves turn yellow and dry out, indicating that the garlic is nearing harvest readiness.
It’s important to note that growing conditions, such as soil fertility, sunlight exposure, watering practices, and climate, can influence the timeline of garlic growth. Keeping a close eye on your garlic plants and monitoring their growth stages will help you determine the ideal time for harvest.

How To Harvest Garlic Scapes
Garlic scapes, the vibrant and curly shoots that emerge from hardneck garlic varieties, are a delightful addition to any homesteader’s kitchen. Not only do they offer unique flavors, but harvesting scapes also encourages the garlic bulbs to grow larger and more flavorful. In this section, we will delve deeper into the process of harvesting garlic scapes, providing you with the necessary knowledge to maximize your harvest.
Garlic Scapes Growth
Garlic scapes typically start to emerge in late spring or early summer, around 2-4 weeks before the garlic bulbs are ready for harvest. It’s essential to keep a close eye on your garlic plants, as scapes develop quickly, and timing is crucial for optimal flavor and texture.
When To Harvest Scapes
Identifying the right time to harvest garlic scapes requires observing their growth stage. When the scapes have fully emerged and formed a pronounced curl, they are ready to be harvested. At this stage, the scapes are tender and have not become woody or fibrous. It’s important not to wait too long, as overly mature scapes can be tough and less enjoyable to eat.
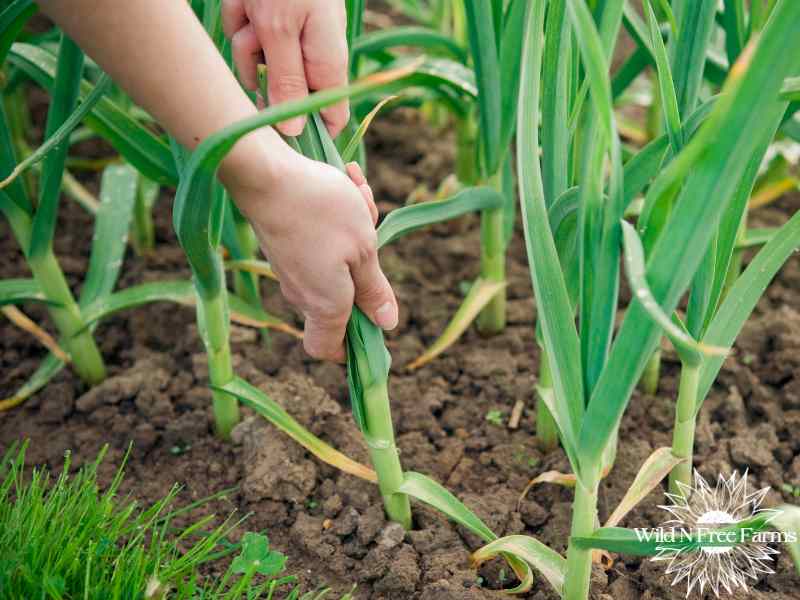
How To Harvest Scapes
To harvest garlic scapes, start by equipping yourself with a pair of sharp garden scissors or pruners. Gently navigate through the foliage and locate the scapes, which will rise above the leaves. Hold the scape with one hand to stabilize it, and with the other hand, position the scissors or pruners just above the topmost leaf where the scape emerges from the plant.
Using a clean and swift motion, cut the scape, ensuring a clean cut without damaging the bulb or nearby foliage. It’s important to leave behind a small portion of the scape on the plant. This allows the plant to continue its growth and direct its energy towards bulb development.
Using Garlic Scapes
Once you have harvested the scapes, don’t let them go to waste! Garlic scapes offer a unique and mild garlicky flavor, making them a versatile ingredient in various culinary dishes. They can be used raw or cooked, adding a delightful twist to salads, stir-fries, omelets, pestos, and more. The tender texture and subtle garlic taste of scapes make them an excellent addition to any homesteader’s kitchen repertoire.
Preserving Garlic Scapes
If you have an abundance of scapes, you can preserve them for later use. One method is to pickle garlic scapes by placing them in a jar with a mixture of vinegar, water, salt, and spices. This preserves their flavor and extends their shelf life. Alternatively, you can freeze scapes by chopping them into small pieces and placing them in airtight containers or freezer bags. Frozen scapes can be conveniently added to your favorite dishes whenever needed.
By harvesting garlic scapes, you not only enjoy a delectable ingredient but also promote the growth of larger garlic bulbs. It’s a win-win situation that allows you to savor the best of both worlds. So, don’t miss out on the opportunity to add these curly gems to your culinary adventures on the homestead.

How To Harvest Garlic Bulbs
Harvesting garlic bulbs is an exciting milestone for every gardener. After months of nurturing and caring for your garlic plants, the time has come to reap the rewards. In this section, we will guide you through the step-by-step process of harvesting garlic bulbs, ensuring that you achieve the best flavor and storage potential.
Determining the Right Time for Harvest
Knowing when to harvest your garlic bulbs is crucial for achieving optimal flavor and storage life. Garlic bulbs are usually ready for harvest when the lower leaves start to turn yellow and dry out. This typically occurs in mid to late summer, depending on the garlic variety and the time of planting.
To ensure accurate timing, it’s essential to observe your garlic plants closely. Avoid harvesting too early when the bulbs are underdeveloped, as they may lack full flavor and proper storage capacity. Conversely, delaying the harvest can lead to overripe bulbs, resulting in reduced quality and shelf life.
Preparing for Harvest
Before you begin harvesting, prepare the garlic plants by gently loosening the soil around them. Use a garden fork or shovel to carefully work your way around the bulbs, starting a few inches away from the stalk. Take care not to damage the bulbs or the surrounding foliage during this process.

Loosening the soil serves two purposes. First, it allows easier extraction of the bulbs without causing damage. Second, it helps to dry out the soil around the bulbs, which aids in the curing process after harvest.
Lifting the Bulbs
Once the soil has been loosened, it’s time to lift the garlic bulbs out of the ground. Carefully insert a garden fork or shovel beneath the bulbs, angling it away from the plant to avoid piercing or bruising them. Gently lift the bulbs upward, supporting them with your hand to prevent any sudden drops or impact. Additionally, you can firmly grip the stalk at soil level and gently pull while rocking in all directions. Once the plant feels loose in the soil, gently pull the garlic bulb out of the ground.
As you lift the bulbs, you may notice some loose soil clinging to them. Shake off this excess soil gently, taking care not to remove the papery outer layers that protect the cloves during storage. Remember, a little dirt is fine, as it helps maintain the bulb’s natural moisture and protection.
Curing the Bulbs
After harvesting, it’s crucial to cure the garlic bulbs properly. Curing is a process that allows the bulbs to dry and toughen their outer layers, enhancing their flavor and extending their shelf life. Find a dry, well-ventilated area, preferably indoors, where you can hang the bulbs or lay them out in a single layer.
Ensure that the curing space is out of direct sunlight, as exposure to sunlight can cause the bulbs to overheat and potentially spoil. Ideal curing conditions involve temperatures around 70 to 80°F (21 to 27°C) with moderate humidity levels. Good airflow is essential to prevent the bulbs from developing mold or rot.
Hang the garlic bulbs in bundles using twine or place them on screens, racks, or trays to allow air circulation. Avoid stacking or crowding the bulbs, as this can hinder proper drying. Allow the bulbs to cure for 2-3 weeks or until the outer layers become dry, papery, and rustling to the touch.

Trimming and Storing
Once the garlic bulbs have completed the curing process, it’s time to prepare them for storage. Start by trimming the roots and stalks. Use clean scissors or pruners to remove the roots, cutting them about half an inch from the bulb. Trim the stalks, leaving about an inch of stem attached to the bulb. These steps help maintain the bulbs’ appearance and reduce the risk of rot during storage.
For long-term storage, it’s essential to choose an appropriate location. Garlic bulbs prefer cool and dark environments with good airflow. Consider storing them in mesh bags, wooden crates, or hanging racks in a cool basement or cellar. Avoid storing garlic bulbs in airtight containers, as they require some ventilation to prevent moisture buildup and rot.
Regularly check your stored garlic bulbs for any signs of spoilage or sprouting. Remove any bulbs that show signs of deterioration to prevent the spread of mold or rot to other bulbs.
By following the techniques and timings outlined in this guide, you are now well-equipped to harvest garlic and garlic scapes on your homestead. Remember, harvesting scapes not only provides a culinary delight but also enhances bulb development. Harvesting garlic bulbs at the right time ensures optimal flavor and storage potential. As a homesteader, growing and harvesting your own garlic is a rewarding experience that brings delicious and healthy ingredients to your kitchen. So, roll up your sleeves, get your tools ready, and enjoy the satisfaction of harvesting homegrown garlic bounty!