How to Make a Pumpkin-Shaped Sourdough Loaf: A Step-by-Step Guide
Sourdough bread is already a work of art on its own, but shaping your loaf into a pumpkin? Now, that’s next-level baking! Not only is it a fun way to bring the flavors of fall into your kitchen, but it’s also a great centerpiece for gatherings or an edible gift. Here’s a detailed guide on how to create a pumpkin-shaped sourdough loaf, complete with tips, tricks, and instructions!

Disclaimer
This post contains affiliate links. This means we may earn a commission should you chose to sign up for a program or make a purchase using these links. There is no added cost to you but your purchase through these links helps support our content! Not to worry- I truly believe in and/or use everything I promote!
We also utilize advertisements on many of our articles. This is simply a way to help support all the work we do here at Wild N Free Farms, without adding any extra cost to our readers. Check out our disclaimer and disclosure page for more details.
The Best Sourdough Bread Recipe for Pumpkin Shaping
When shaping sourdough into a pumpkin, the most important factor is using a dough that holds its structure well and has enough hydration to expand during baking without flattening out. A traditional sourdough recipe works beautifully for this, as it typically yields a well-balanced dough that rises nicely and can handle the added twist of being tied with butcher’s twine.

Customizing with Flavors
Of course, you’re not limited to a traditional sourdough loaf! Feel free to experiment with flavors that fit the autumn season. Some delicious variations include:
- Pumpkin pie sourdough: Incorporate a couple of tablespoons of pumpkin puree into the dough, along with spices like cinnamon, nutmeg, and cloves. This adds flavor and a lovely orange hue to your loaf.
- Cinnamon raisin sourdough: Mix in cinnamon and soaked raisins for a sweet, seasonal twist.
- Savory garlic and herb sourdough: Add chopped garlic, rosemary, or thyme to the dough for a savory loaf perfect for serving with soups and stews.
Remember that flavor variations may slightly alter your dough’s hydration, so adjust the water as needed to keep the dough workable and elastic.
Stick to What Works for You
When trying out a new shaping technique like this pumpkin loaf, it’s often best to stick with a bread recipe and technique that you’re already comfortable with. If you’ve made sourdough before and have a recipe that works well for your kitchen and your process, it’s smart to start there. The familiarity with how your dough behaves during fermentation, shaping, and baking will give you confidence when adding the twine and experimenting with new shapes.
In the end, the best bread recipe is the one you’re most comfortable with—whether it’s the traditional loaf or a new flavor combination. Once you’ve mastered shaping with your go-to dough, feel free to get creative with different ingredients and flavors!

Step-by-Step Instructions for Making a Pumpkin-Shaped Sourdough Loaf
Step 1: Prepare the Dough
Start by mixing your leaven the night before. Combine your active starter, water, and flour, mixing until you have a shaggy dough. After a 30-minute rest, add the salt and incorporate it well.
Now, perform your stretch-and-folds every 30 minutes over the course of two hours. Allow the dough to bulk ferment for another 4-6 hours at room temperature, or overnight in the fridge.
Step 2: Pre-Shaping the Dough
Once the dough has completed its first rise (bulk fermentation), gently turn it out onto a lightly floured surface. Shape it into a round (boule) by tucking the edges underneath to create tension on the surface of the dough. Cover it with a towel and let it rest for 20-30 minutes.
Step 3: Final Shaping
For the final shaping, repeat the same process. Tighten the tension on the top of the boule by gently pulling the edges toward the bottom. This will help it hold its shape during baking and ensure a well-defined pumpkin shape later on.
Step 4: Second Rise (Proofing)
Place the dough into a banneton or bowl lined with a floured towel. Cover it and let it proof for 2-3 hours at room temperature, or pop it in the fridge for a longer cold ferment (6-12 hours).

Step 5: Preparing the Butcher’s Twine & Oven

To create the classic pumpkin ridges, you’ll need butcher’s twine. Here’s how to prepare it:
- Preheat your oven to 450°F (230°C) with a Dutch oven or a baking stone inside.
- Cut 4 pieces of twine long enough to wrap around the entire loaf, with enough extra length to tie a knot at the top. Aim for about 24-30 inches per piece.
- Soak the twine in oil (olive or avocado oil works well). This prevents the twine from sticking to the dough during baking and ensures easy removal later. Simply place the twine in a bowl with a bit of oil and coat it thoroughly.
- Lay the twine on your work surface in a crisscross pattern like a star, with each piece of twine overlapping at the center. You should have 8 equal sections.


Step 6: Wrapping the Dough
Now it’s time to create the pumpkin shape!
- Place the dough in the center of the crisscrossed twine.
- Bring up the twine strands and tie them gently but snugly at the top of the dough, creating sections that resemble pumpkin ridges. Be careful not to tie too tightly, as the dough will expand during baking.
- Adjust the sections if needed, ensuring that the twine divides the dough evenly into 8 parts. You can gently nudge the twine to adjust the spacing of the ridges.

Step 7: Scoring and Baking
- Score the individual pumpkin layers with decorative scoring. This will give the dough a bit more room to expand during baking.
- Bake with steam by adding some ice cubes or water to a preheated tray in the oven or using the lid of the Dutch oven. Bake for 20 minutes with the steam, then remove the lid or tray and bake for another 20-25 minutes until the crust is golden brown.

Step 8: Removing the Twine
Once the loaf is baked and has cooled slightly, carefully remove the twine by cutting it and peeling it away. You should be left with beautifully defined ridges, giving your sourdough loaf the perfect pumpkin appearance.
Extra Tips and Tricks for a Perfect Pumpkin Sourdough Loaf
- Don’t over-tighten the twine. If the twine is too tight, the dough will expand too much during baking and may break through the seams, disrupting the pumpkin shape.
- Use oil-soaked parchment. If you’re worried about the twine leaving marks, you can place a small square of oiled parchment paper between the twine and the dough at the center where the knot sits. This will minimize any deep indents in the center.
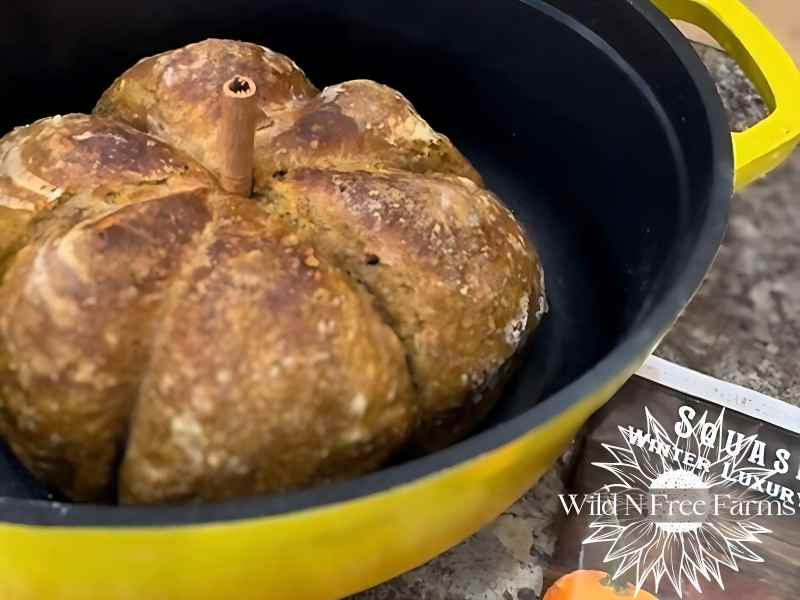
- Add a “pumpkin stem.” For an extra decorative touch, after baking, place a small cinnamon stick or a piece of pecan in the center where the knot was tied to mimic a pumpkin stem.
- Embrace flavor with spices. Add warm fall spices like cinnamon, cloves, or cardamom to the dough. You can also mix in pumpkin puree for a richer taste and a more vibrant orange hue.
- Shaping control: If the dough seems a little slack during shaping, place it in the fridge for 15-20 minutes. This will firm it up, making it easier to shape and tie without sticking or sagging.
- Control fermentation with temperature: For best results, aim for a consistent dough temperature during fermentation. If your kitchen is too warm, the dough might ferment too quickly and lose its structure. Adjust the water temperature or opt for a cold ferment to keep the process slow and controlled.
Crafting a pumpkin-shaped sourdough loaf is not only a fun project but a stunning way to showcase your baking skills. With the right technique, some butcher’s twine, and a bit of creativity, you’ll be pulling a beautiful, edible “pumpkin” from your oven. Happy baking, and enjoy the taste of fall in every slice!
| Did you try this recipe? Share your creation with us on Instagram @wildnfreefarm or tag us with #wildnfreefarms |


